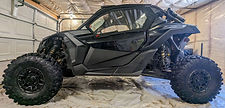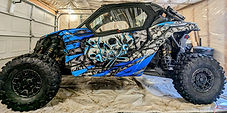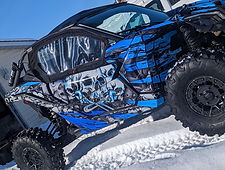
Welcome to Barrett Hepburn Design - custom graphics specialists. Our comprehensive installation guide is designed to provide answers to all the common questions; however, if you have any other queries please don't hesitate to contact us.
Barrett Hepburn Design is dedicated to bringing your build to the next level. We're stoked to be included in some of the biggest and best builds out there!
PRE-INSTALLATION:

When you receive your kit, keep it clean and stored away from any dust or pets. Dirt, dust, or hair can greatly reduce the effectiveness of the adhesive potentially leading to bubbles or even failure.
Machine must be clean of all mud and debris and all factory or aftermarket decals removed from your machine prior to application of the wrap kit. Any left over residue from factory or other decals must also be removed prior to installation. Failure to do so could result in improper adhesion and greatly reduce the longevity of your wrap kit. Once all the decals have been removed, it is essential to clean every surface to which the graphic kit will be applied.
Water is not enough! Use Isopropyl alcohol (70% or 99% is best for timely evaporation) to wipe down all surface areas where pieces will be applied. Textured plastics such as those found on recreational off-road vehicles like side-by-sides will grab and hold dirt - the Isopropyl alcohol wipe down must be repeated 3-5 times to ensure correct bonding between wrap kit adhesive plastics.
Preparation of installation area is imperative to a successful installation process and product adhesion. It is the sole responsibility of you, (the client / customer) to ensure all areas to have vinyl wrap kit pieces installed are clean of any dirt, clear coats (including but not limited to silicone based detailing products), debris and detritus. All surfaces must be wiped down at least 3-5 times with Isopropyl alcohol (70-99%) prior to installation and may require further cleaning if any type of clear coat is present. If you have any questions regarding installation, we are more than happy to help.
INSTALLATION:

Thanks to the premium nature of our vinyl, Barrett Hepburn Design wrap kits are easily self-installed. Take your time and plan on spending a few hours installing your graphics and achieving best alignment. Please be aware, there will be trimming involved! All our kits are manufactured using pre-made templates with some pieces being over-sized for easier installation requiring trimming post install.
Pre-installation, it pays to place the pieces from the wrap kit onto the application surface with the paper backing still on. This allows you to get an idea of how they are positioned and how to achieve best alignment.
*It is essential to install the pieces for aftermarket doors last. This way, the installer can find the absolute best alignment with the rest of the stock pieces. Installing aftermarket door pieces first will lead to mis-alignment with the rest of the design.
Once the kit is in place, pick a piece to lay and start with a corner. Roll back the edge of the vinyl on the starting corner. Remove the paper backing and apply a corner to the application surface. Make sure the un-applied graphic is still lined up after the starting corner is applied. It is easiest to tack the piece down gently to begin with, in case you need to re-adjust the positioning. After the entire graphic is lined up, peel back more backing paper from the un-applied graphic and use your thumb or a small squeegee to flatten out the graphic to the surface. It is best to start at the top of the piece and gradually work your way out / down toward the rest of the piece.
Repeat this process for remaining pieces until all graphics in the wrap kit are applied accordingly. Our wrap kits are made from thick vinyl giving the benefit of allowing pieces to be taken back up and adjusted until best alignment is achieved.
Once all pieces have been tacked down into place, flatten down into place and apply heat to set the adhesive. This essential step will bond your wrap kit to your machine allowing it to contour to the shape. A blow-dryer or heat gun works best. At this point, you can smoothe any small wrinkled edges. Apply a small amount of heat and tap it down with your finger to flatten these areas out.
It is important to note: there will be trimming involved! Inspect the kit and trim any pieces over-hanging the plastics. Failure to trim appropriately could lead to improper fit and potential for dirt to become trapped underneath later leading to lifting and failure of the wrap kit due to improper installation. Be sure to use a sharp razor blade or knife to ensure clean cuts.
After installation is complete on all areas, let the machine sit for at least 24hrs in a clean, dry area.
We have done our best to make the graphics kit as easy as possible to install but if needed seek professional help or contact us.
TIPS:

-
It is essential to install the pieces for aftermarket doors last. This way, the installer can find the absolute best alignment with the rest of the stock pieces. Installing aftermarket door pieces first will lead to mis-alignment with the rest of the design.
-
There will be trimming involved! Expect to trim any excess vinyl from your machine.
-
The vinyl wrap kit pieces will become more malleable the warmer they get. Installing in a 60°F - 100°F environment is best.
-
Properly cleaning of the application surface prior to installation is critical for the longevity of your wrap kit.
-
For ease of re-installation of any hardware that may have been removed; use a razor blade, knife or scissors to carefully cut an ""X"" or single slit from the top side of the vinyl, through the hardware hole.
-
Be firm with the graphic wrap kit pieces to help avoid air bubbles developing.
-
If there are small air bubbles once you have finished heating the wrap kit and setting it in place, use a pin to release the air or wait until a sunny day and go for a ride - the direct heat from the sun will help to work them out.
-
There is no need to use soapy water to install our graphics.
DISCLAIMER: We use the best quality vinyl available to the market; however, misuse can shorten the lifespan of your wrap kit. Proper installation is essential with preparation of the installation area being absolutely key. Areas to have the wrap kit installed should be prepared with removal of all other decals (factory and aftermarket), all residue removed, and all areas to be wiped down with clean rags and Isopropyl Alcohol 70-99% at least 3-5 times but possibly more should the presence of clear coat or other detailing products be detected.
Please Note: It is the sole responsibility of the client / customer to ensure the proper preparation steps have been completed prior to installation and that all residue and clear coat product (such as but not limited to, silicone based detailing or restoration products) have been completely removed. Failure to do so will lead to failure of the installation process.
We have tried to make the kit as simple as possible to self install; however, Barrett Hepburn Design / BHDWraps.com are not responsible and cannot be held liable for installation of any type - self, or third party. Proper preparation of installation area is imperative to a successful installation process and product adhesion. It is the sole responsibility of the client / customer to ensure all areas to have vinyl wrap kit pieces installed are clean of any dirt, clear coats (including but not limited to silicone based detailing or restoration products) and detritus.


